

Creating an a11y audit kit
Breaking down my approach to accessibility auditing for the NIH's All of Us research program. 🧐
Our Commitment to Accessibility
At Color, I’m part of a team that spans a multitude of different disciplines (product design, content design, design technology, engineering, and more) with a single, lofty goal: implement processes to ensure that we conform to WCAG 2.0 AA!
If you’re unfamiliar with WCAG, it stands for Web Content Accessibility Guidelines and it’s essentially the accessibility “bible” for digital experiences. As a design technologist with a neuroscience background, Color’s endeavor to create equitable healthcare experiences that account for the diversity of the human experience is right up my alley, so I was eager to take part in our goal of focusing on the accessibility of our web applications from the moment I joined the team.
In time, we started to see two primary accessibility work streams:
- Routinely audit existing products for WCAG 2.0 AA compliance (or, making things as accessible as possible)
- Working on our processes and workflows to foster ongoing WCAG compliance as we build new features and new products going forward (or, keeping things as accessible as possible)
A lot can be said about these items, but I’d like to focus on the first one for this article. I knew we wanted to make fixes and improvements to our products so they are up to accessibility standards, but… how? How can I identify what needs fixing in our apps? Where do I look for problems and what am I even really looking for? If you’re here reading this you’re likely fumbling with the same questions at your company, and that’s exactly why I’m writing this article!
I recently ran my first product accessibility audit at Color (with the guidance and wisdom of my trusty Design Technology counterpart, Cordelia), and I learned a ton from it that might be helpful for you. We chose to start with our product that supports the All of Us Program in conjunction with the NIH and many other great partners (shameless plug), and I created a reproducible process from my learnings out of this audit. Today I’m going to share it with you so you can use it too. Oh —and to make this a bit more immersive and exciting, I’m going to audit your product with you right now by walking through each step of our flashy new A11y Audit Kit. It’s going to be fun, I promise!
Note: “a11y” is a numeronym for “accessibility”, where “11” is used to denote the number of letters between “a” and “y”. From here on out, this article will refer to “accessibility” as “a11y” accordingly.
The A11y Audit Kit
You’ve been very patient so here it is! Our A11y Audit Kit is a collection of documentation and tools, like Deque’s axe DevTools chrome plugin, which can empower anyone to jump in and audit a product’s core flows for a11y issues. The elevator pitch:
It’s a framework for auditing, documenting, and creating remediation plans for a11y issues in a product. And it’s dead simple.
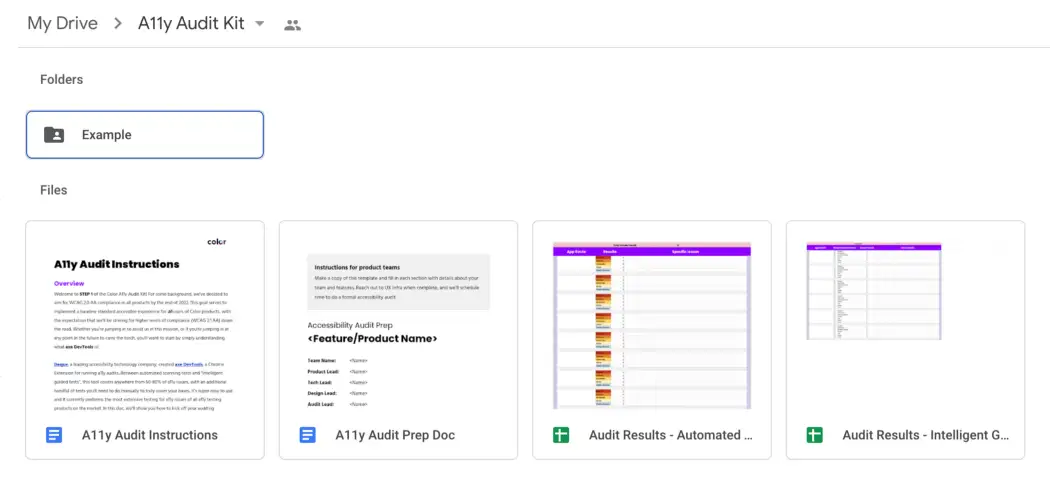
Currently, our kit lives as a Google Drive folder with some goodies inside, like so:
- A11y Audit Prep Doc
- A11y Audit Instructions Doc
- Audit Results — Automated Tests
- Audit Results — Intelligent Guided Tests
- Examples folder
Ready to use it to audit your product of interest? Why wait, let’s go!
Step 1: Copy the Kit and Get it Ready!
Let’s kick it off fellow auditor! You’ll want to start by copying the kit and getting it ready for this specific product audit. Nice work — I can tell you’re a natural already!
Step 2: Documenting Core Flows — The A11y Audit Prep Doc
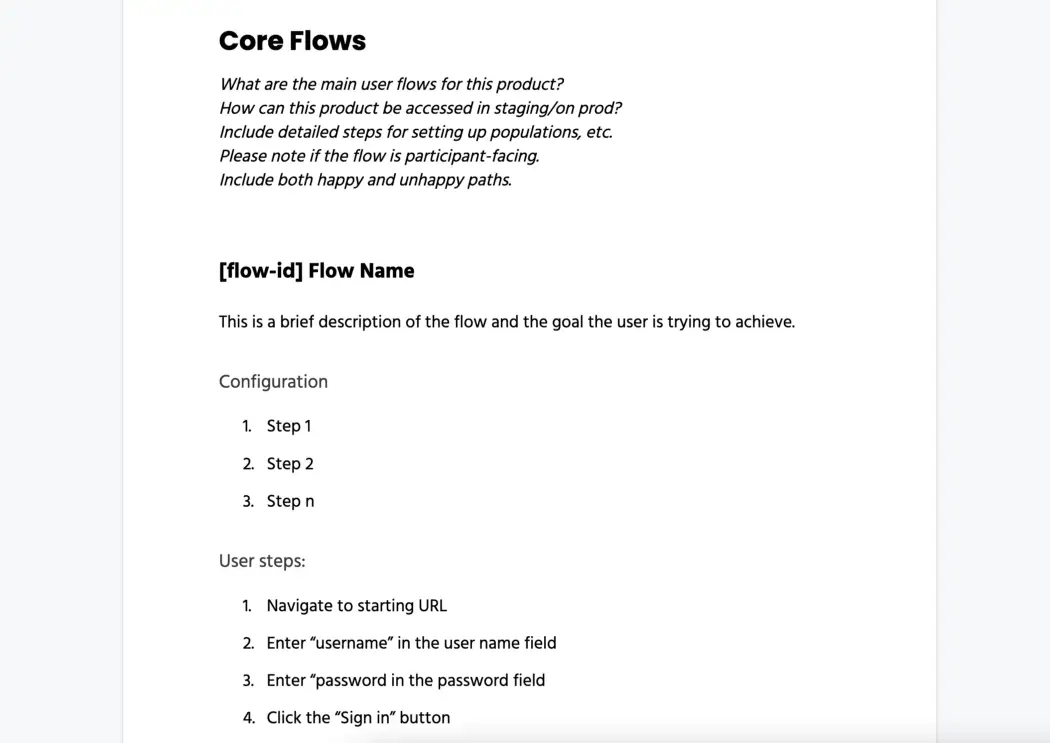
Time to crank open the A11y Audit Prep Doc. This is a Google Doc in which the auditor will document core flows of the application they’re going to be testing.
As you can imagine, production applications tend to have tons and tons of pages/routes, many of which may not be a part of the app’s “core flows”. We decided that documenting the product’s core flows would be a crucial step in getting the most bang for your buck in an audit, especially since we (like many companies these days) leverage reusable components in our front end code and the core flows likely contain the majority of these components, if not all of them, in at least some small frequency.
So go ahead and fill this out for your product! First document how to get setup with a test account in staging, local dev environments, etc. Next document what the user should do to traverse the core flows once logged in with an account. Note what to click on, what page the user is on at each step, and all that good stuff.
Note: once you’ve completed this doc, run it by the product manager(s), designers, tech lead(s), etc. for this product team. It’s great to get a second look from those who know the product best, if that’s not you.
Alright, great work! You’ve got this product’s core flows documented clear as day, what a sight to see! Let’s continue.
Step 3: Let’s Audit! — The A11y Audit Instructions
With the product’s core flows documented, you’re ready to crank the A11y Audit Instructions doc out and let it guide you on your audit journey. This doc goes into great detail about how exactly you can use Deque’s axe DevTools plugin for Chrome to perform an audit on a page in your app, log issues in the provided sheets, and turn that data into actionable tickets for engineering and design teams.
To start, this doc explains that axe DevTools has two types of tests to help find accessibility issues:
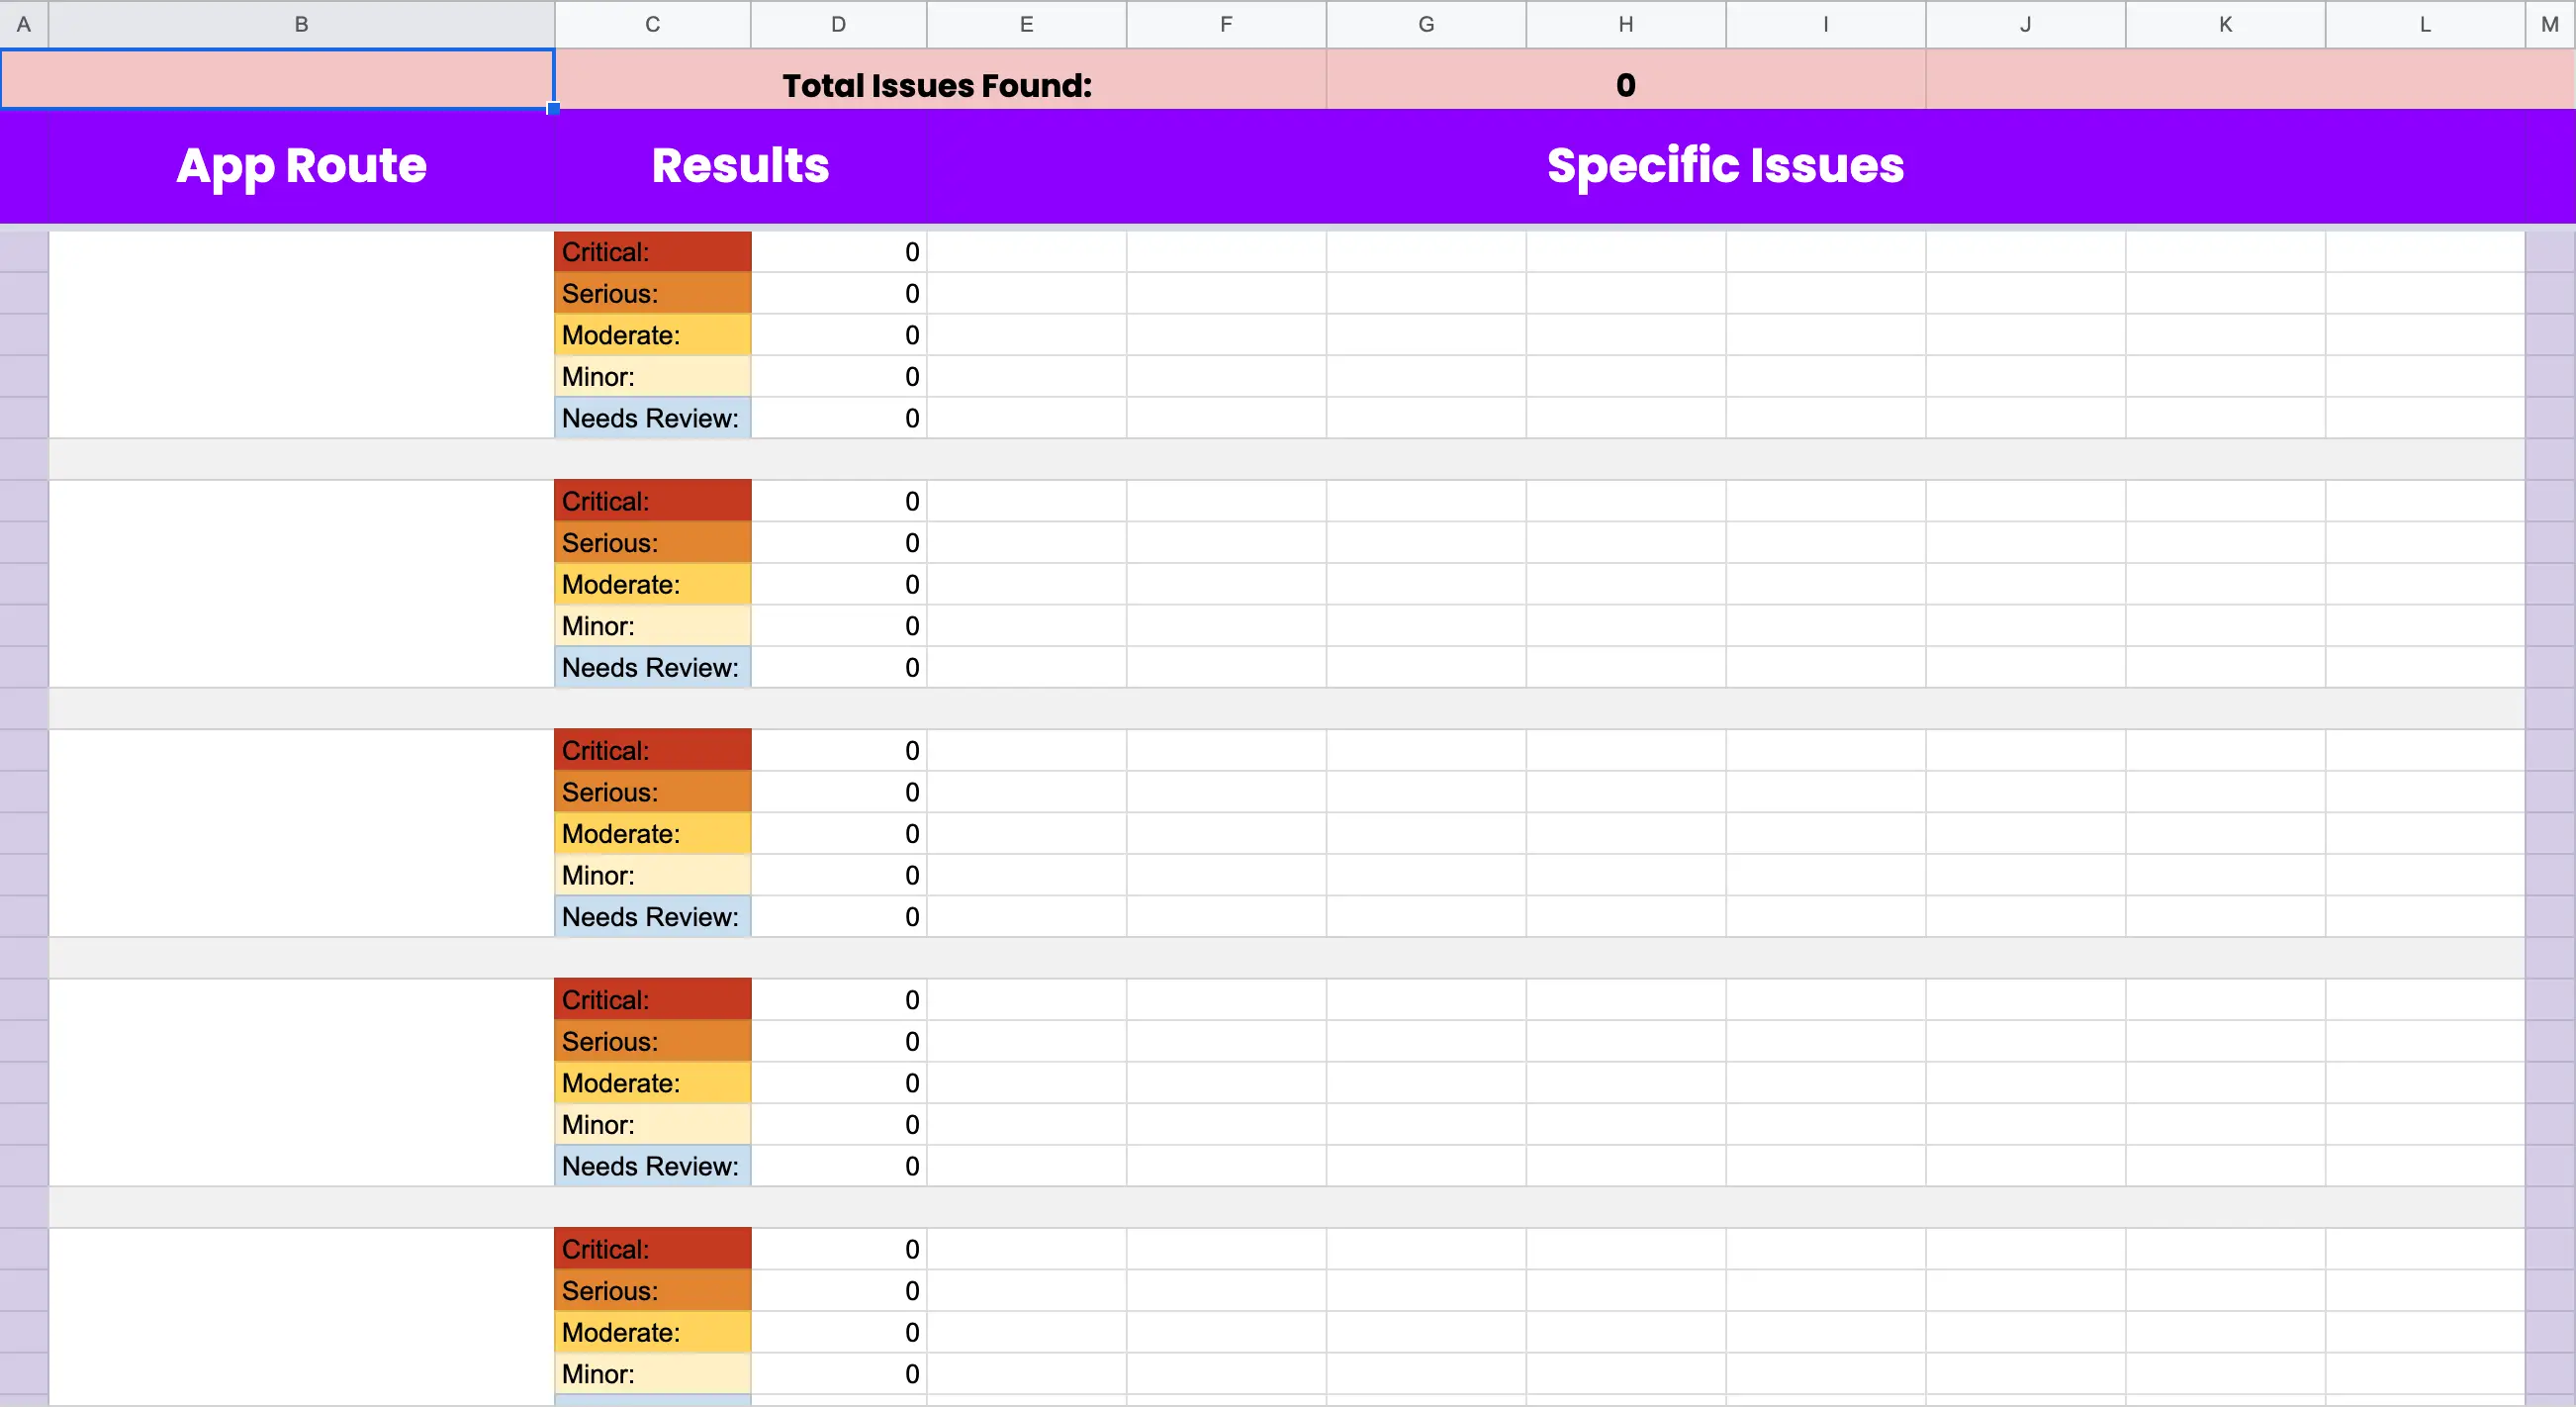
- Automated Tests — scans the entire page you’re on for common accessibility issues, outputs the number of issues found with a breakdown of each one that you can highlight in the browser. Covers about 57% of a11y issues!
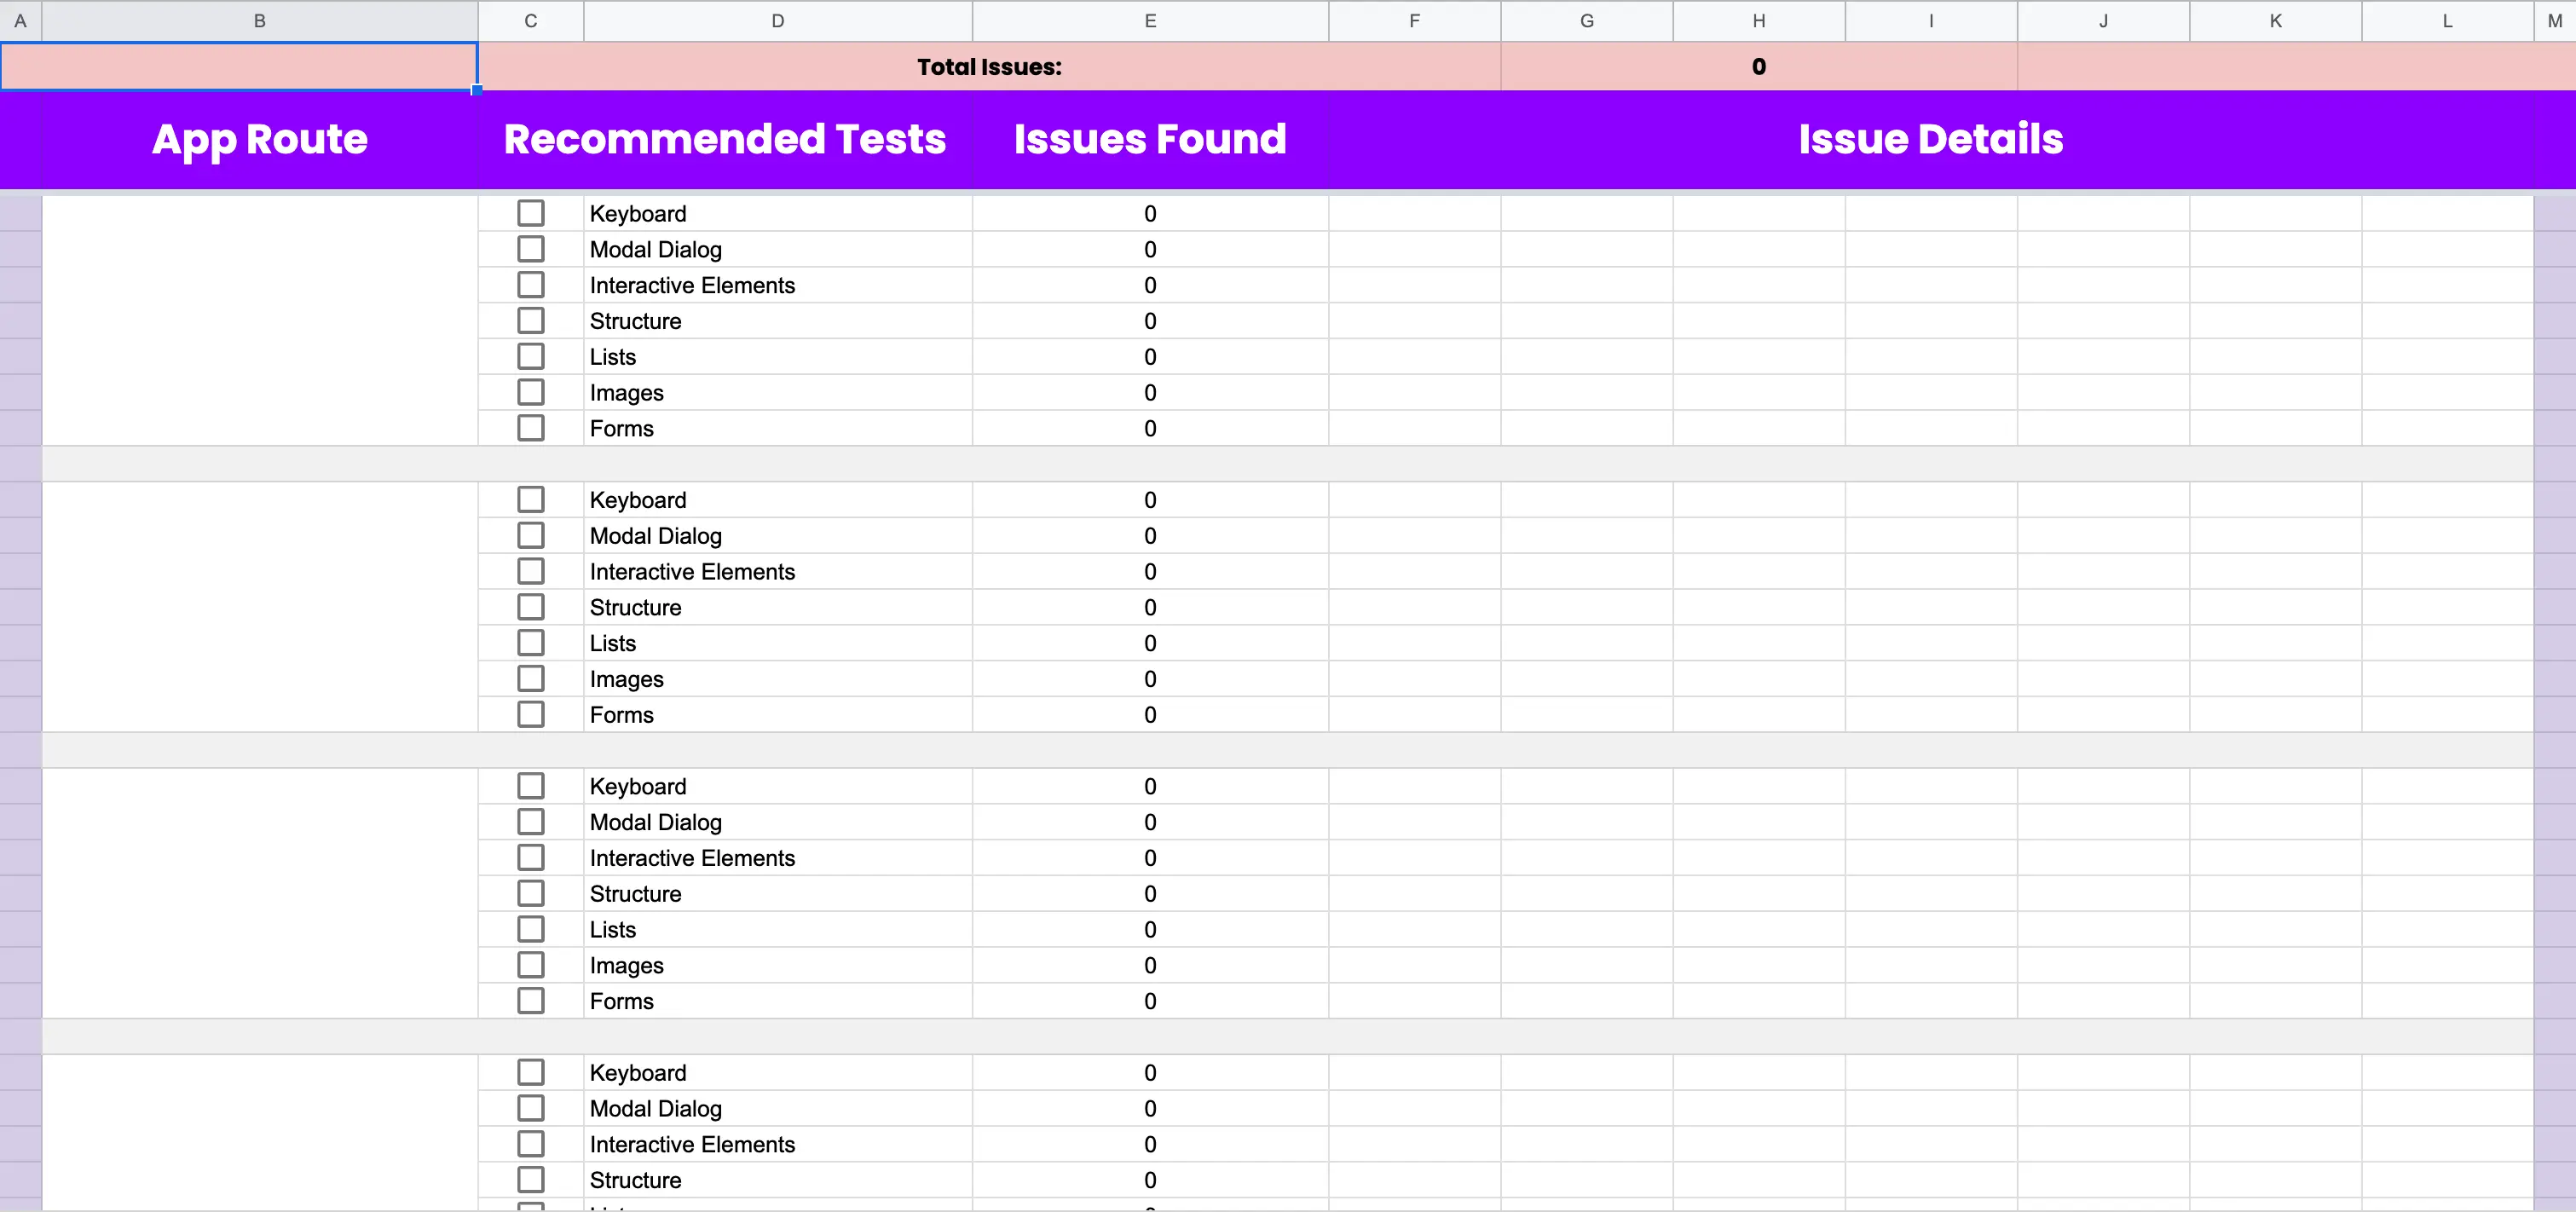
- Intelligent Guided Tests — tests that are run somewhat manually with some guidance from the plugin’s UI, more focused (like keyboard navigation tests, heading order tests, image tests, etc.), with a nice output of results and recommended fixes. Extends your a11y issue coverage to 80% or more!
Running these two types of tests on each page of your core flows (see the doc we finished in Step 2) is the bread and butter of the audit! At each step, axe DevTools will output incredible interactive reports and you’ll want to log that data into the two results sheets: Audit Results — Automated Tests + Audit Results — Intelligent Guided Tests.
These Google Sheets are designed specifically for axe’s output in each type of a11y test, so your axe results should translate seamlessly into the two Audit Results sheets.
Ready to take it for a spin yourself? Traverse your product’s core flows and run axe DevTools every step of the way, logging the output in the results sheets provided in the kit — this is the moment you’ve been training for your whole life! (Just kidding, no pressure.)
The two Google Sheets used to log the results of the axe DevTools audits on each step of the core flows
Nice — that was super fast! With your two results sheets chalk-full of a11y bug data, you’re ready to create some actionable work for your designers and engineers!
Step 4: Remediation Planning— The A11y Audit Instructions (cont.)
At Color we use Jira, so this process is geared toward that, but I’m confident you’ll be able to bridge any gaps between our process and your own. Luckily, the A11y Audit Instructions has a nifty section on ticketing the work, complete with a guide on prioritization of issues and everything.
Thus, your next assignment is to comb your two Audit Results sheets, Automated Tests and Intelligent Guided Tests, and create Jira tickets. At this point, some of the most glaring a11y issues are probably quite apparent from your audits, with select issues popping up all over the place and being quite high priority based on axe’s ratings. You may even decide to create a special accessibility epic under which each of these tickets can live, which is the approach we took here at Color!
Finally, be sure each ticket contains a nice description of the issue, links to resources, components or elements of interest, and recommended fixes, all based on the highly informative axe results.
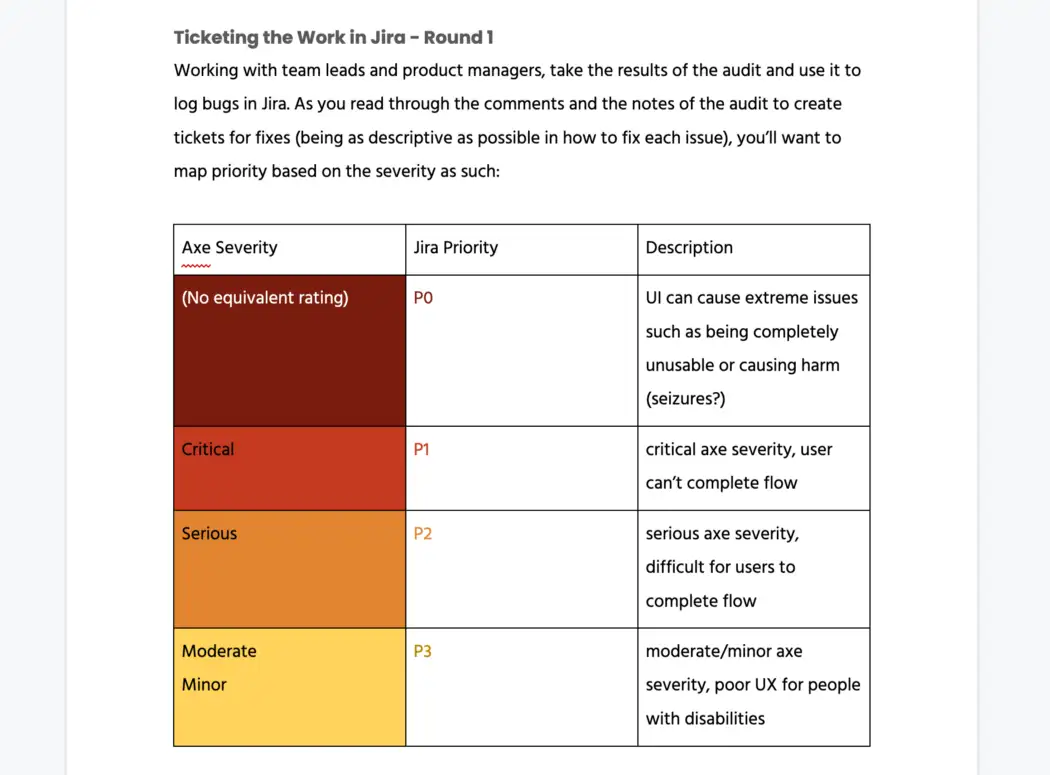
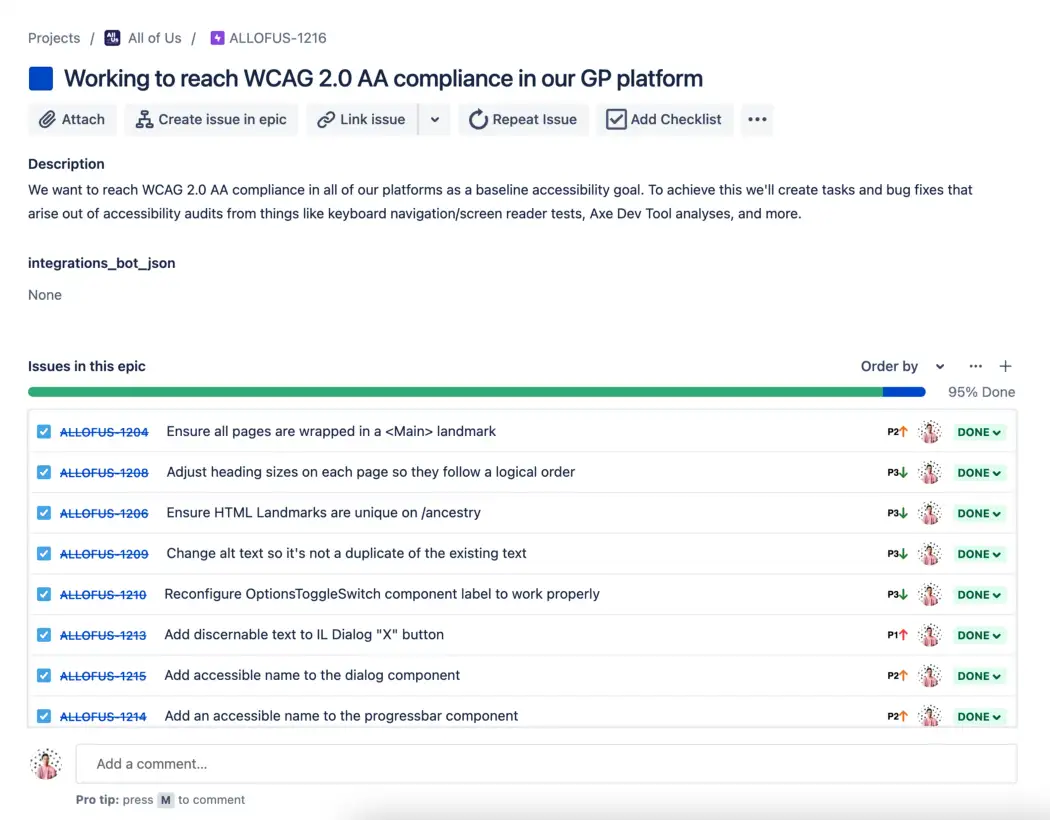
Creating tickets and mapping their priority from axe DevTools to JiraOur Accessibility epic in Jira, full of tickets and tasks
With a nice epic built out, descriptive Jira tickets ready to go, and a supportive team eager to dive in and fix stuff, you’re off to the races! Work with your product manager(s), designer(s), engineer(s), etc. to get these tickets completed over however many sprints you may need.
Step 5: Tying Up Loose Ends!
At this point, you’ve watched (and maybe even helped firsthand) as the team addressed each ticket meticulously. The product has slowly grown with each design change and code PR into a beautifully accessible state, which is no small feat!
Your final steps are essentially due diligence. From any of your saved axe DevTools tests, there’s a link called “What’s left to test?” which shows things you can check manually from here. It should be on the screen where you view the recommended tests to run, above the various cards for each intelligent guided test. Address these items, log any additional work, help facilitate its completion on the team, and drive this thing home.
Breathe — you’ve accomplished a lot! Your product is now essentially WCAG compliant, or at the very least it now meets high a11y standards born out of rigorous a11y testing and fixing!
Congrats on a job well done. It’s a long, arduous process, but it’s so important to identify where our products shine and where they need work. Thanks for taking part in Color’s mission to make tech products accessible for all and we had a blast auditing your product with you! We hope this A11y Audit Kit helps serve as a model for awesome companies like yours looking to build more accessible, equitable user experiences. Cheers!
Got your own framework like our A11y Audit Kit? We’d love to hear about what has and hasn’t worked for you in making accessible products! Share your thoughts with me by contacting me anytime!